

An Introduction to CrossFire
CrossFire provides a simple but powerful single-window application for creating crossword puzzles.CONTENTS
- Installation
- Starting Crossfire for the First Time
- Main Interface & Making Puzzles
- Additional Operations
INSTALLATION
The exact installation sequence varies by OS. We provide details for each major OS below.Windows
- Make sure that you are running Java 1.8 or later. The latest version of Java can always be downloaded from http://java.com/.
- Run the supplied installer. It will remind you if you forgot step (1).
Linux
- Make sure that you are running Java 1.8 or later. The latest version of Java should be available at http://java.com/.
- Unpack the supplied .tgz file in a location of your choosing.
- Run the supplied "crossfire" shell script.
Macintosh (OS X 10.7.3 & later)
- If you already have a Java 1.8 or better installed, download the "app-only" installer. If you don't have Java 1.8 or are not sure, download the "app+Java JRE" installer.
- Double click on the installer. You will typically want to choose the default options.
- Look for the executable app under "/Applications" and the auxiliary files under "/Library". Brand new installations will automatically find the library files, but anyone upgrading from version 1.2 or earlier may have to explicitly search there for the default dictionary and sample puzzles.
Starting Crossfire for the First Time
On first execution you will be shown a configuration dialog which will allow you to modify the behavior of the program. There are quite a few options which we will describe here. If this list seems overwhelming, don't worry. You can skip over it for now, and return to it at any time via the Edit/Config (Windows & Linux) or CrossFire/Preferences (OS X) menu item to customize CrossFire's behavior. You may well wish to keep them all (except perhaps for the dictionary files) at the default values in any case.Fill Options
The "Fill" tab of the configuration dialog will let you specify options that control the word-choice and quality in automatic or assisted grid fills.- Min fill word score:
- Enter the minimum word score to be used in fills (either automatic "quick fills" or interactive fills via the fill tab). By excluding words in this manner you can guarantee that generated fills will have higher scores, but may it impossible to generate any fills at all. Much finer control may be gained through interactively filling the puzzle via the "Fill" tab.
- Longest shared substring:
- Enter the length of the "maximum shared substring" which may be introduced by the grid filler. If you use the default value of "3", this means that the auto-filler would allow "theater" and "IAteTheWholeThing" to exist in the same puzzle, but not "theater" and "preheats" (since the latter contains the common 4 letter substring "heat").
- Candididate quality ranking:
- Set the fill candidate quality, which controls how thoroughly words are examined before added as candidates on the fill tab. The consequence of lowering this setting is faster fills, but poorer "Grid Score" estimates and the chance of more poor words slipping through. Raising the setting should give slower "candidate generation" but higher-quality fills.
- Speed/Quality tradeoff
- This slider lets you choose how much work CrossFire should perform in it's search for a high quality fill. The default value provides a reasonable trade-off, but if you don't mind waiting (or have a very fast machine), you may wish to increase it in order to get even better fills. (You will likely wish to keep it below 90%, as the ultimate quality setting will definitely make you wait a while. (Note that "quality" is based upon the scores in your dictionary, and will thus vary based upon the quality of those raw scores.)
Dictionary options
CrossFire takes the list of words that it will use for filling grids from one or more "dictionary" files. These files are defined via the "Dictionary" tab of the configuration dialog. By default, CrossFire will read words from the "default.dict" which is included, and write any changes to a brand new "MyEdits.dict" file. However, you will likely wish to specify your own. The format is fairly simply to produce by hand -- a set of "word;score" lines, with scores between 1 and 100. The "default.dict" file which is included with the distribution is mechanically derived from the WordNet distribution. While imperfect, it should be enough to get you started.The dictionary list can contain an arbitrary number of files (though it must contain at least one). Files which are selected via the associated checkbox are considered "active", and the icon to the left of the checkbox indicates whether the file actually exists. When the dictionary is loaded, it will contain all the words from all of the active dictionaries. If a word is contained in multiple dictionaries, then the score and punctuation is taken from the top-most dictionary in which it occurs. This is the active definition, and any occurences in lower dictionaries are shadowed by this upper definition. Note that a dictionary file can specify a score of "0" for a word. If this is the active definition for the word, it will be eliminated from the dictionary, even if there are other shadowed definitions with non-zero scores.
One active dictionary file must be designated as the "primary" dictionary. This is the file into which newly added words are placed, and may also be used when words are edited. See Dictionary maintenance for more information.
If you have Gold subscription to the Cruciverb website, CrossFire makes it easy to get the most from its premium word-lists. Just select the default dictionary for now, and later you can choose the "Dictionary/Merge word list into dictionary" menu option, and specify "Use CrossFire score database" when importing the word lists.
(Note that if your private word list has accented or international characters, they must be in UTF-8 character encoding. If you are not sure about how your file is encoded, you should use the "Merge word list" capability, described below, which will perform appropriate conversions.)
Special/accented chars
Also under the Dictionary tab is a sub-panel which lets you specify any accented or special characters that should be preserved exactly as they occur in the dictionaries. Typically accented characters are converted to their unaccented equivalents (i.e. "é" becomes "e") and non-letter/numeric characters are dropped (i.e. "head-first" is treated like "headfirst"). However, by hitting the "change" button in the "Preserve special/accented chars" sub-panel, you can choose to have CrossFire handle some or all of 60 selected special characters without any conversion. This can be handy for special purpose puzzles, or if you are working in a foreign language which might, for example, routinely treat "ñ" as distinct from "n".General options
- Web lookup URL:
- Set the URL used for the "Lookup word on web" command on various context menus. The default is Google, but you may enter any valid internet address here. Use "%s" to indicate where the search word should be substituted.
- Clue database
- If you have a copy of the "Clue database" utility by Matt Ginsberg, you can enter a link to its "cluedata" file on this line. The utility may be downloaded from: https://tiwwdty.com/clue/, and provides comprehensive lists of clues which have been used in most of the top syndicated crosswords, as well as many independently published puzzles. (It provides its own useful external interface as well as being accessibly from within CrossFire.) You may leave this blank for now if you have not installed a clue DB.
- Auto-select definitions when in clue tab:
- If selected, this allows you to immediately select a clue for typing by clicking on the corresponding word in the grid. Otherwise, the grid itself will remain selected for typing and you will have to select the clue using the mouse or CTRL-C.
- Show numbers in grid:
- This checkbox does just what you'd expect, but it's perhaps not obvious why you'd rather leave it unchecked. By not showing word numbers by default, CrossFire can show the fill letters more clearly and, more importantly, show detailed hints about upcoming possibilities during interactive fills. Regardless of whether you check the box, you can always find word numbers via rollover "tool tips".
- Auto-add complete cross words.
- This checkbox controls an important behavior in the fill tab. If left unchecked, you will be shown (and asked to enter) each word in the grid, even those which are filled "by side effect" as a result of filling all of the words which cross them. Many people consider this useful, since it means no words slip in by mistake. However, since it can mean extra work, you might wish to make CrossFire automatically enter these words for you by checking this box.
You will only have to specify these defaults once, but you can change them at any time you choose via the Edit/Config menu item.
Puzzle files
When you execute Crossfire, it will ask you to specify the name of an existing puzzle, or to create a new grid. For starters, you may wish to load the sample grid "StopAndGo.cfp" which was supplied with this distribution. Crossfire uses its own internal "crossfire puzzle" format is its native save file, but you can also load files in Across Lite binary (.puz) or text (.TXT) format.If you prefer to create a new puzzle from scratch, simply specify the desired width and height, and a completely blank grid will be provided for you.
Main Interface & Making Puzzles
After specifying the grid, you will see the main interface to the program. On the left you will see the crossword grid, and on the right you'll see up to 5 tabs: Summary, Words, Fill, Clues, Lookup, and Rebus. (The last two of these can be hidden, if desired, via checkboxes in the "tabs" menu. This might produce a less distracting display if you don't regularly use these tabs.)The puzzle grid
The grid is always available for manipulation, even in the midst of an interactive fill. You can easily select or modify it using either the mouse or the keyboard.To get started with the grid, you'll need just a few concepts:
- Put in black squares (blocks) by SHIFT-clicking or selecting squares and hitting PERIOD ('.').
- Select squares by clicking with the mouse or moving around with the arrow keys.
- Manually add letters by simply typing them in.
- Delete letters or black squares using BACKSPACE or DELETE.
However, it's worth realizing that there are actually three varieties of "selection" in the main grid.
- Square selection
- At any given time, there is a single square which is the primary focus of keyboard operations. It is indicated by a dark blue background. You can type new characters in at this location; erase them via the DELETE and BACKSPACE keys; or add new black squares by hitting the PERIOD ('.') key (or SHIFT-clicking). You can set the selection with the mouse, or move it around using the arrow keys. (Note, however, that the first time you hit an arrow key, may simply change the direction of the "word selection", as described below.)
- Word selection
- When the square selection is on a letter or a white space (i.e. a "word square", then CrossFire will typically focus on an entire word. The selected word will be the focus of operations in the other tabs, such as interactive filling, clue specification, or dictionary editing. Since two words usually cross on a word square, the selected word may be horizontal or vertical. Crossfire shows you which one is currently selected by highlighting the squares in light blue. You can change from horizontal or vertical (and vice versa) by clicking the mouse on the square selection, by hitting the TAB key, or by pressing an arrow key which is perpendicular to the current word direction.
- Area selection
- On occasion you will wish to select arbitrary sections of the grid as the focus of certain operations. These "area selections" are created by clicking and dragging, and are highlighted in a light purple. Existing selections can be extended by holding down the CTRL key (ALT on Macintosh) while dragging. When there is an area selection, the "quick fill", "clear letters", and "clear grid" operations are all restricted to the selected area, as is interactive grid filling. In addition the DELETE key becomes enhanced: if the selection contains non-THEME letters, then only the letters in the selection will be deleted. Otherwise, the theme letters and black squares will be cleared. (It's actually fairly intuitive in practice. One DELETE clears minor stuff, while two clears everything.)
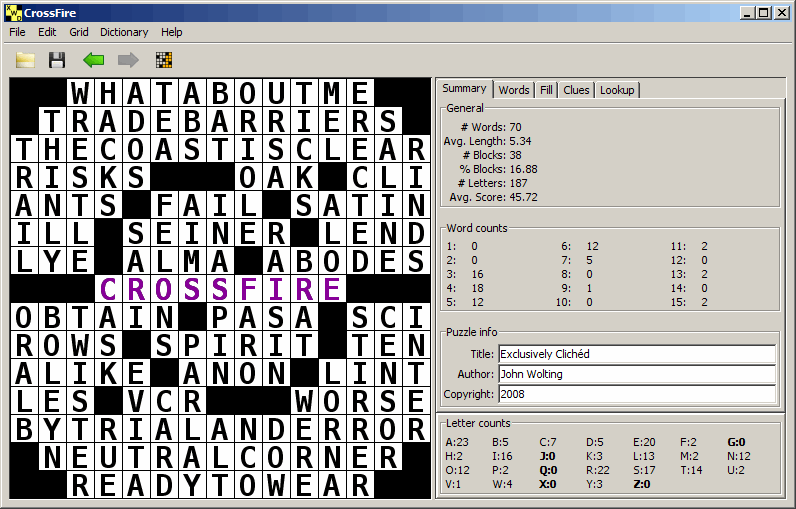
Summary tab
The Summary tab gives you general statistics about the grid. While you are creating the grid, it will show you how many blocks you have, and how many words of each length you have. If you accidentally create one or two letter words, you will see them not only highlighted in the Word Counts panel, but also highlighted in pink on the grid itself. It also includes a "Letter counts" panel which shows you how many of each letter is included in the puzzle. Unused letters are highlighted in bold.You can click on any of the word counts or letter counts in order to highlight the appropriate words/letters in the grid. The selected count will remain selected until you specify a different one or click on it again to unselect it. The highlighting, like the counts themselves, will be dynamically updated anytime the grid changes.
The Summary tab also contains a "Puzzle Info" panel in which you can enter title, author, and copyright information about the puzzle, along with an optional "note" containing info for solvers. Not only is this generally useful information, but the first three are required if you wish to export the puzzle in Across Lite format. (It will also be used when you print the complete puzzle, export it as an image, or export it for NYT publication.)
Words tab
The Words tab shows a list of all complete words which have been entered in the grid, along with their lengths, their scores, and a measure of their "crossing score". The latter is provided in the belief that one difficult word in the puzzle is not necessarily a problem, but a difficult word that crosses many other difficult words likely is a problem. By sorting low "XScore"s to the top of the list, you can quickly see trouble spots in your grid. If you select a word in the grid, it will be highlighted on the Words tab, and vice versa.You can also highlight one or more words and press ctrl-E (or select Dictionary/Edit Selected Words) to update the scores or spellings within your dictionaries (see Dictionary Maintenance below). Alternatively you can right-click any word in the list to bring up a menu allowing you to see a clue list, edit the word, or look the word up on the web.
The words tab may also be used to search for shared substrings between different words in the puzzle. If you specify "Highlight shared strings" in the selector at the bottom of the panel, CrossFire will use orange letters to show parts of words which are the same as portions of other words. If you select those words, these shared substrings will be highlighted in light green. If you instead specify "Show shared strings", then the list will be restricted to only words which have shared letters. This lets you quickly scan through such words and determine whether any of them are troublesome. If you don't want to be bothered with any of this information, simply specify "at least 99 letters long", and you should never see any such highlighting. (Note that the threshold for highlighting is independent of the "config" option for "maximum shared substring". You often, for example, wish to allow 3 letter substrings, and yet be able to look them over to be sure that you haven't accidentally slipped in effectively equivalent words such as "ended" and "ending".)
Fill tab
The Fill tab provides access to interactive grid filling. This is, in our opinion, the best way to create a high quality puzzle. While we provide a "quick fill" option to let you get a quick look at possibilities, we find that an interactive fill provides a "human touch" that will never be duplicated by an automatic facility.Whenever the selected word is incomplete, the fill tab will provide a list of possible words to fill that space. This list will be filled incrementally, including only words which have a high likelihood of leading to successful puzzle fills. Furthermore, CrossFire will continue examining the words, removing those which don't lead to successful fills, and marking in bold those which have been proven to lead to successful fills. (Note that by selecting the "Fill/Show eliminated candidates" menu option you can disable the deletion of unsuccessful fills. Some constructors find this handy if they wish to try hand-filling with words that aren't in their dictionaries. Others merely find it distracting.)
Within the word list, you can examine several different scores:
- Word Score: dictionary-assigned score for a word.
- Grid Score: measure of the quality of the neighborhood immediately around the word. Generally any value over 0.9 indicates a pretty good word, while lower values are generally going to lead to bad fill values in the near future.
- Final Score: measures the quality of a complete grid fill created with this word. (This value is relative to that of the first fill found. Thus, typically one fill will be at "1" and others will be slightly more or less than 1.)
Whenever you select a potential fill word, you will see that word in the grid. You will be typically be shown other information, depending on the setting of the "Fill/Show Sample Fill" and "Fill/Show Possible Letters" menu items, as follows:
- If "Show Sample Fill" is selected and there is a known fill for the word, that fill will be shown in light gray. (Typically, there is no guarantee that this will be the best fill. However, if the space being filled is a small corner [10 words or fewer], CrossFire will go back and take the extra time to find the best solution [according to its criteria]. Such optimal solutions will have their scores highlighted in bold face.)
- If "Show Possible Letters" is set to "Always", then forced letters will be shown in a darker gray, and squares which are limited to sets of 2-9 possible letters will show those possibilities in miniature form. (This will give you a "quick glance" impression of how the succeeding words will be constrained.) This will happen whether or not there is a known fill for the grid.
- If "Show Possible Letters" is set to "When forced", then forced letters will be shown in dark gray, as above, but other possible letters will only be shown if there is no known fill for the grid. (This keeps the possible letters from obscuring the potential fill.)
- If "Show Possible Letters" is set to "Never", then neither forced nor possible letters will ever be shown.
Simply double-click or hit "RETURN" after selecting a word to enter it into the grid. You may also bring up the right-click context menu for any word and select the "Insert Word in Grid" option. In addition, if the word is highlighted as "definitely fillable", you will have the option to "Insert Complete Fill".
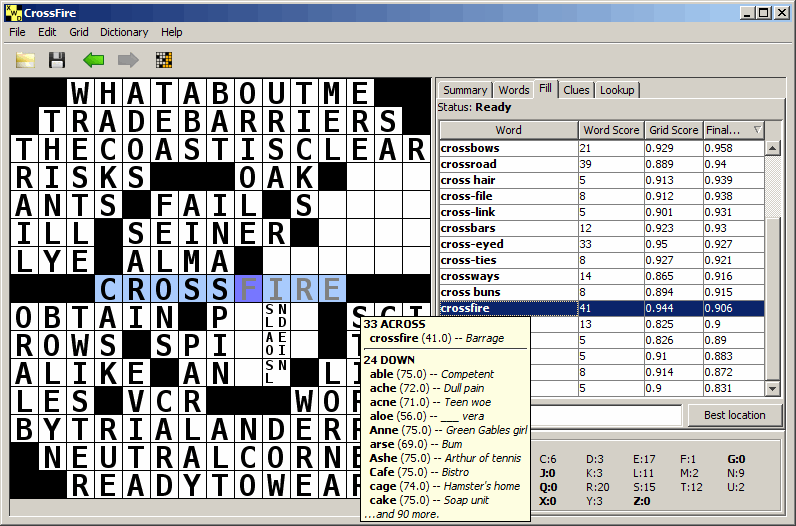
Note that you can freely enter any of the words from the list, whether confirmed or not, without waiting for the evaluation to finish. You don't have to worry about making a wrong choice -- if you don't like the consequences of a selection, you can simply "undo" that word choice and go back to where you started. All of the original words and evaluations are remembered, so you won't have to wait for it to redo all of its work. In addition, the paths you have "visited" are marked in a light brown so that you can remember which ones you've already tried. If you particularly like or dislike one of the words that you've tried, you can use the context menu to mark it as "good" or "bad", and it will be highlighted in green or red.
After you select a fill word, the filler will automatically select another space to be filled. If you don't like that space, you can simply select any spot on the grid you like, and the filler will switch to that word. You can also, at any time, hit the "Best Location" button to have the filler choose a constrained word which will give the most "bang for the buck" in the filling process.
If you already have some idea what sort of word you wish to put into a space -- for example you know that you want the word to end in "ing" -- you can specify a regular expression in the "Filter" box. (A value of "ing$" would select for only ING endings.) The filler will then limit itself to just matching words, so that you can concentrate on what you want.
As described in the Puzzle Grid section, you may also drag the mouse over just a section of the puzzle to select that region. If you do this while in the Fill tab, the checks for "complete" fills and display of candidate words will only include the selected squares (and other squares required to complete words within the selection). For difficult Saturday-level grids, this may help make the filling process more manageable. If you find yourself needing to select a particular square within the selected region, you can use CTRL-click.
Clues tab
The Clues tab is used, not surprisingly, for writing clues for the words that have been added to the grid. Simply select the appropriate blank and type in the clue you want. You can use TAB, SHIFT-TAB, RETURN, UP-ARROW, and DOWN-ARROW to navigate around this list. You can also select any word you like within the grid and then hit "CTRL-C". (If you have the "Auto-select definitions when in clue tab" config option selected, you don't need to hit "CTRL-C": the clue will automatically be selected for you. However, the keyboard shortcut is still handy for quickly switching to the clue panel from elsewhere.)If you have connected to a clue database, then there will be a panel at the bottom of the Clues tab which lists all known clues for whichever word is selected. You can use this to help you in your own clue selection. If you find the clue list to be distracting, you can hide it by selecting the arrows on the divider bar. In order to automatically use one of the clues shown, just double-click on it, and it will be inserted. (Note: Some puzzle editors have expressed displeasure with constructors who re-use existing clues rather then generating new and original clues for themselves. You shouldn't use the clue panel as a substitute for creativity if you want your puzzles to get published.)
While working in the clue-editing panel, you can also right-click a word to see a menu allowing you to edit the word, or look the word up on the web.
Lookup tab
The "Lookup" tab is used to do arbitrary word lookup within the dictionary. Specify any regular expression within the "Pattern" box, and it will give a complete list of matching words. (Again, as with most word list displays in CrossFire, you can right-click any word in the list to bring up a menu allowing you to see a clue list, edit the word, or look the word up on the web.) You can further limit the words by specifying whether the supplied pattern should be "anchored" to the front or back of the word, and what range of lengths or scores are desired.Note that, since the pattern is an arbitrary regular expression, you can not only type "foo" to look for any word containing those three characters but also (for example) "b[aeiou]+k[aeiou]+s" to find words with one or more vowels separating the letters "b", "k", and "s". (This will find "bakes", "bookies", and "Uzbekistani".) Remember that because CrossFire's uses regular expressions instead of "globbing" matches, the * and ? wild cards may be different than what you are used to. (Basically, you will end up using ".*" and ".?" where other systems might have you use "*" and "?". This can be confusing at first, but is a lot more powerful. See below for more information.)
By default, the search is performed on the "crunched" form of the dictionary entry, which has been reduced to only lower case alphabetic letters, so you should always enter your search in lower case, without spaces. However, you can change this in the "Content:" box, as follows:
- Lower case letters
- The "crunched" form described above.
- Lower case word(s) with punctuation
- All words will be folded to lower case, but all spaces and punctuation marks will be retained just as they appear in the dictionary.
- Original word(s) with punctuation
- All words will be treated exactly as they appear in the dictionary.
Regular expressions.
A few of the most serviceable pattern matching operations are listed in the table below. Notice that as an alternative to using the "anchor" box, you can also use the ^ and $ symbols as part of the search pattern.| SYMBOL | EXPLANATION | EXAMPLE |
| . | matches any 1 valid character (similar to MS-Win file search ? wild card) | c.t finds both cat andcot |
| .* | matches any character zero or more times (similar to MS-Win file search * wild card) | fl.*rt finds flirt,flaubert & flowchart |
| [ ] | matches any 1 of the bracketed characters | sh[ou]t finds shot & shut but not shout |
| ^ | ^ 1st in a pattern anchors it to the start | ^en finds enter but notcenter |
| [^] | bracketed ^ means "anything but" | [^aeiou] finds any consonant |
| $ | $ last in a pattern anchors it to the end | en$ finds even but notevent |
| (|) | separate alternatives with | to find either | gr(ai|ee)n finds both green & grain |
| - | use - to find any 1 of a range of letters | ta[m-p] finds tam, tan, tao &tap |
| + | matches preceding element 1 or more times | ab+a finds aba abba but notaa |
| ? | matches preceding element zero or 1 time | tame?s finds both tames &tams |
| * | matches preceding element zero or more times | pal* finds pa pal &pall |
| \b | matches zero characters, but only
if at a word boundary (fails otherwise) | \bit\b finds make it so but not pitfall |
You can read more on regular expressions at the Perl documentation site
Rebus tab
The "Rebus" tab allows you to associate a particular set of dictionary substitutions with the puzzle. This allows you for example, to treat the letters "STAR" as a single letter, so that "(STAR)POWER" would be considered a six letter word. Because the support is completely integrated, this substitution will be properly reflected within the grid display; the interactive and "quick" grid fill algorithms; word and clue lookup; word editing; and export/printing. Because it is saved as part of the puzzle state, the appropriate dictionary maintenance is automatically handled when you exit CrossFire and then re-open the puzzle at a later date. If you change the "substituted" dictionary, the underlying dictionary will be updated appropriately so that "save dictionary" will reflect your changes to the original word data.In other words, everything should just work for you without any effort on your part.
For any new puzzle, the Rebus panel will start effectively empty. There will be an unpopulated table, and an "Add" button at the bottom. If you press the "Add" button, you will be asked to specify the letter sequence that should be treated as a single letter (i.e. "star" above), and a letter which users will use to enter the answer into an interactive application (such as Across Lite or CrossYYYs). If you simply hit return, CrossFire will fill in the "User equivalent" with the first of the substituted letters, but you can choose any other value you like.
When you hit "OK" to add the new rebus, it will show the letters and the user equivalent, but it will also potentially show an additional character that can be used to enter the rebus into the CrossFire grid. (The User Equivalent won't work because it is not unique. However "@", for example, would be.) There will also be a "+" button that can be used to enter the rebus into the currently selected square. Finally, the table entry will include a red "X" button which allows you to remove the rebus.
If you add "star" as a rebus using the above method and insert it into the grid using either the assigned insertion character or the "+" button, it will be displayed as a set of small letters centered in the square. If you move your mouse over the square, the rollover "tool-tip" will show possible insertion words which include the "expanded" form, and display clues based upon that expanded form. You can keep adding rebus strings to the table in this manner, up to a maximum of 100. (This arbitrary limit corresponds to the maximum number of rebuses which can be stored in a binary Across Lite file. If you are going to be saving to an Across Lite "text" file, you should actually limit yourself to 10 rebuses. As of this time of writing, we have never seen more than 50 rebuses in a single published puzzle, but there is undoubtedly a more complex example out there somewhere.)
Additional Operations
In addition to the main tabs described above, there are a few operations which can be accessed only via menus or buttons, and which you may need on occasion.Theme entries
In many cases, construction of your puzzle will start with designation and placement of a small number of "theme" entries. These are the heart and soul of the puzzle, and you may completely rework the rest of the puzzle several times while keeping the themes relatively undisturbed. CrossFire gives you the ability to explicitly mark these entries so that they will be "protected" from random BACKSPACE, DELETE, and "clear letters" operations, and so that you can see them more clearly as you are working.In order to mark a word as a theme entry, simply select it and then choose Grid/Mark Selected Word as Theme (or simply hit CTRL-T). The word will now be rendered in purple, and will be protected as described above. Theme entries are also rendered in bold face in the "Words" and "Clues" tabs.
Circles
Some puzzles give hints, or otherwise display information to the solver, by putting circles into selected squares. You can add a circle to any square (or remove a circle that is already in a square) by selecting that square and typing CTRL-O. The cursor will automatically advance to the next square so that you can easily enter a full word's-worth of circles if desired.Quick fill button
The "Quick Fill" button is just what the name implies. You can hit it at any time, and it will try to find a fill for the current grid (or area -- see below). It introduces enough randomness into the process that you should get a different fill any time you invoke it. If you don't like the result, just hit Undo and try again.If a fill attempt fails, the region of the grid where quick-fill got bogged down will be shown highlighted in red. Note that this is an approximate indication of the failure area, and may not highlight just the single problem word. (In particular, due to the "lookahead" performed by the search algorithm, it is actually more likely to highlight a word which crosses the single "bad" word than the word itself. However, in most interesting cases there simply is no one single word which is the source of a failed fill.) Remember that if a grid word leads to a dead end and has no candidate fills, that word will be pre-emptively highlighted in pink even before you try to do a fill.
Typically the quick fill tries to fill the entire grid, since typical crossword grids are fully connected. However, the quick filler actually examines the grid and potentially divides it up into isolated unfilled "neighborhoods". If there are indeed multiple non-connected neighborhoods, it will always fill just the one closest to the selected square. Further clicks of the quick fill button will fill the remaining unfilled neighborhoods, since one of them will now be the "closest".
As mentioned earlier, you can get even more control over the area to be filled by explicitly dragging the mouse to create "area selections". If there is such a selection, the fill will be restricted to that area. (In fact, it will go outside that area enough to confirm that the unselected portions of partially selected words are fillable, but those unselected portions won't end up in the inserted fill.) Some users find that they prefer to fill the puzzle one section at a time by using this form of restricted fill. (As mentioned before, we suggest that you consider using interactive fill instead, and explicitly moving to whatever area you consider critical at any given time. However, it's your puzzle, and you will undoubtedly do things your way.)

Dictionary maintenance
As mentioned earlier, your CrossFire dictionary is maintained in one or more simple text files. If you wished, you could maintain them by hand in a text editor, or with whatever other tool you favor. However, CrossFire provides various operations to make it easy to perform the most common varieties of dictionary maintenance.At almost any point within CrossFire, you can hit CTRL-E (or select "Edit Word(s)" from a context menu) to bring up the "Edit Words" dialog. Though simple in principle, this dialog actually provides an enormously powerful tool for selectively updating any or all of your dictionary files. (Note: If the explanation seems too confusing, you can just ignore the next few paragraphs and trust that your edits will do the right thing by default and will be made permanent when you invoke the "File/Save dictionary" function.)
For each word, you are given the option to change the word's score or its "punctuation" (i.e. the capitalization, and extraneous non-letter characters such as spaces, periods and dashes). If you hit the "Next" button, the following happens by default:
- If you changed nothing, than no dictionary file will be changed.
- If the "primary" dictionary is above the first dictionary which defines the changed word, then the word will be added to the primary dictionary, which will also have the effect of changing the internal dictionary.
- Otherwise, the change is applied to the first dictionary which defines the word, which will once again have the effect of changing the internal dictionary.
By pressing the "Advanced" button, you can expand the dialog to get increased control over the changes to the dictionary. You will be shown a list of all dictionaries, with "Change" checkboxes for each dictionary, and "Delete" checkboxes only for the dictionaries that currently contain definitions for the word. You can check all, some, or none of the "Change" boxes, and the appropriate dictionary files will be changed when you hit "Next". If you hit a "Delete" box, the word will be removed entirely from that dictionary. (Note that, if you don't explicitly check any boxes, they will be automatically selected in such a way as to preserve the default behavior described above. This sub-panel is a way to enhance the default behavior, rather than a replacement for it.)
Note that if you explicitly manipulate the selected dictionaries so that changes are applied only to dictionaries which are below the one that provides the "active" definition, then the changes will be "shadowed" in the internal dictionary and won't have any visible effect. However, the appropriate files will still be affected, and the changes may later become visible if you remove or re-order some of the dictionary files.
Note that there are two varieties of word "deletion" that you can perform. If you set a word's score to "0" in the topmost defining dictionary, the word will not be included, even if it has non-zero scores in other "shadowed" dictionaries. Alternatively, you can use the "Edit words" dialog to actually remove the word from the dictionary files. In this case, the score and punctuation will be taken from any lower dictionaries that might previously have been shadowed. If you remove the word from all dictionaries, it will of course be totally gone.
You can add new words through the "Add new word(s)" menu item. This will show you a dialog very similar to the "Edit Words" dialog described above. However, you will be given the chance to freely type whatever words you want, and specify the desired score for each word. (Specified scores will be carried from word to word in order to make it easy to keep the same score for all additions.) The specified words need not, in fact, be new: if they already exist, they will be handled exactly as if you were editing them with the "edit words" dialog, except that they won't automatically inherit the existing score.
If you wish to do a large bulk addition of words, specify per-word scores, or merge several word lists, you can use the "Merge word list into dictionary" operation. (If you don't wish to include the contents of the current dictionary, simply invoke "Clear current dictionary" first. Ignore the pink "no available word" grid highlighting. It'll go away.) This dialog gives you extensive options to control the scores to be used for the incoming words, and the proper way to handle words which are contained in multiple lists. They should, for the most part, be self explanatory.
One interesting option is "Use CrossFire score database". CrossFire is shipped with knowledge of the relative common-ness of various words (gleaned from analysis of large amounts real-world usage). It can apply this knowledge to external word lists, and in particular to the word lists made available to Gold Members of Cruciverb.com. This can make it much easier to get maximum utility from these lists. (Note that we can not provide you with these lists ourselves, since they are owned by other parties, nor can you "reverse engineer" the lists from the CrossFire database.)
Another advantage to using the "Merge word list" operation is that it will take extra care to make sure that international characters are interpreted correctly. This is a tricky issue, since there is no single encoding which is used everywhere. CrossFire uses the UTF-8 encoding, which is quite versatile, but some source may use the Window ("ISO-8859-1") encoding instead. The merge operation will detect which of these encodings the input file uses and interpret it appropriately.
Export and print
Although it is all very well to be able to create a puzzle and view it within CrossFire, this is of limited use if you can't then put it in a form that is useful outside of the program. The Export and Print sub-menus provide means to do just that.For many users, all you will ever need is the "Export as Across Lite" option. Across Lite is a standard format, and the solving application of choice for Windows users. There are also versions available for Macintosh and Linux, as well as third-party substitutes. These will support printing, solving, and distribution. Typically, you would wish to export directly to Binary format, which is what most people use. However, if you wish to add special features, such as notepad entries, you can export in the Text format and then modify it as needed before using Across Lite to convert it to Binary form.
Exporting as "Grid Image", "Solution Image", or "Puzzle Image" all produce portable PNG image files. These are lossless and widely supported by all drawing tools and web browsers. For the first two forms, you specify the size of each individual square (in pixels), while the last form asks you to specify the overall dimensions of the entire page. (Appropriate font sizes and grid sizes will automatically be chosen to provided a pleasing page layout for the complete puzzle image.)
Exporting "Numbers, Words & Clues" produces a basic tab-delimited text file. It contains all of the answer information for the puzzle in a convenient from for "do it yourself-ers" to manipulate as needed for publication.
The Print sub-menu allows you to send all of the graphical images described above to a printer. However, instead of asking you to explicitly specify dimensions, CrossFire scales them to the paper size specified by the printer.
The print menu also privides a "NYT submission" option. This prints out the puzzle in a format which should conform in all particulars to the standards set by Will Shortz for submission to the New York Times. You will be asked to specify your postal and e-mail addresses for inclusion in the print-out, and CrossFire will do almost everything else for you. (Stamps and envelope not included.) The address info will be remembered from session to session. You can also override it by including your address info in the "Copyright" field, with the lines separated by "*"s. (This may seem odd, but it provides backwards compatibility with Alex Boisvert's conversion utility, which provided inspiration for this capability.)
Due to technical issues, CrossFire does not give you the capability to export to acrobat format. However, a good PDF printer driver can produce very high quality PDF files. For Windows, we have gotten excellent results from PDF995. Macintosh users can simply select "print to PDF" from the print dialog. Linux users might wish to check out cups-pdf.
Shortcut-key summary
- crtl-C -- Edit clue for selected word
- ctrl-E -- Edit dictionary
- ctrl-F -- Start & stop quick fill
- ctrl-G -- Clear all/selected spaces, themes and blocks included
- ctrl-L -- Clear all/selected (non-theme) letters from entire grid
- ctrl-N -- Open new puzzle file
- ctrl-O -- Toggle circle in selected square
- ctrl-S -- Save a puzzle file
- ctrl-T -- (un)Mark a word as a theme entry
- ctrl-Z -- Undo fill or block modifications
- ctrl-Y -- Redo fill or block modifications